Food I Love

& my Big Green Egg

Join me as I share my kitchen adventures and mishaps while trying to create simple food inspired by childhood memories back in South Africa. 

  • Home
  • Blog
  • About
  • Gallery
    • Braai Images
    • Big Green Egg Images
  • Contact Me
Paella on the Braai/BigGreenEgg

Paella on the Braai

April 05, 2013 by Larry Susman in Baking, Big Green Egg, Braai, Chicken, Fish, Meat, Potjiekos, Recipes

Paella on the Braai/BigGreenEgg

Well, I'm 2/3rds of the way through my promise to cook every week on the Braai, through rain, snow, -10c and the occasional sunny day! Very occasional, I think it's shone for about 10 days in 8 months but never mind, we BRAAI not matter what's happening outside.

This week I'm having a go at the quintessential Spanish dish “Paella” this is my version of it, it might not be what you think its should be and I'm not claiming to be an expert but this is a great Paella to start with and a good base for experimenting. So have a read and then give it a go and let me know what you think. Basically this is the Spanish version of a Potjie.

SERVES 4-6: PREP: 20MINS: COOK TIME: 20-30MINS

Rub
 Ingredients for your Paella:

  1. 700g x Chicken Meat (Leg, Thigh or Breast meat diced into bite-size pieces - keep the skin & bone on for extra flavour)
  2. 6 x Large Tiger Prawns
  3. 12 x Large Mussels
  4. 1 x fresh Squid cut into rings
  5. 700g x Spanish paella rice
  6. 200g x diced cooking choritzo
  7. 1 x Red pepper (sliced & roasted if possible)
  8. 1tsp of Sweet Paprika
  9. 3-4 x medium, ripe tomatoes or a large tin of chopped tomatoes
  10. 2lt x Hot chicken or vegetable Stock
  11. 1 x Medium onion, finely chopped
  12. Pinch of Saffron (I like quite a bit)
  13. Extra virgin olive oil
  14. Salt to taste
  15. 1 x lemon (cut into wedges for decoration)

Don't forget to use  a 40cm to 50cm Paella Pan, it makes all the difference.

Method how to prepare and cook Paella:

  • Preheat the Braai/BigGreenEgg to 200ºF/94ºC.
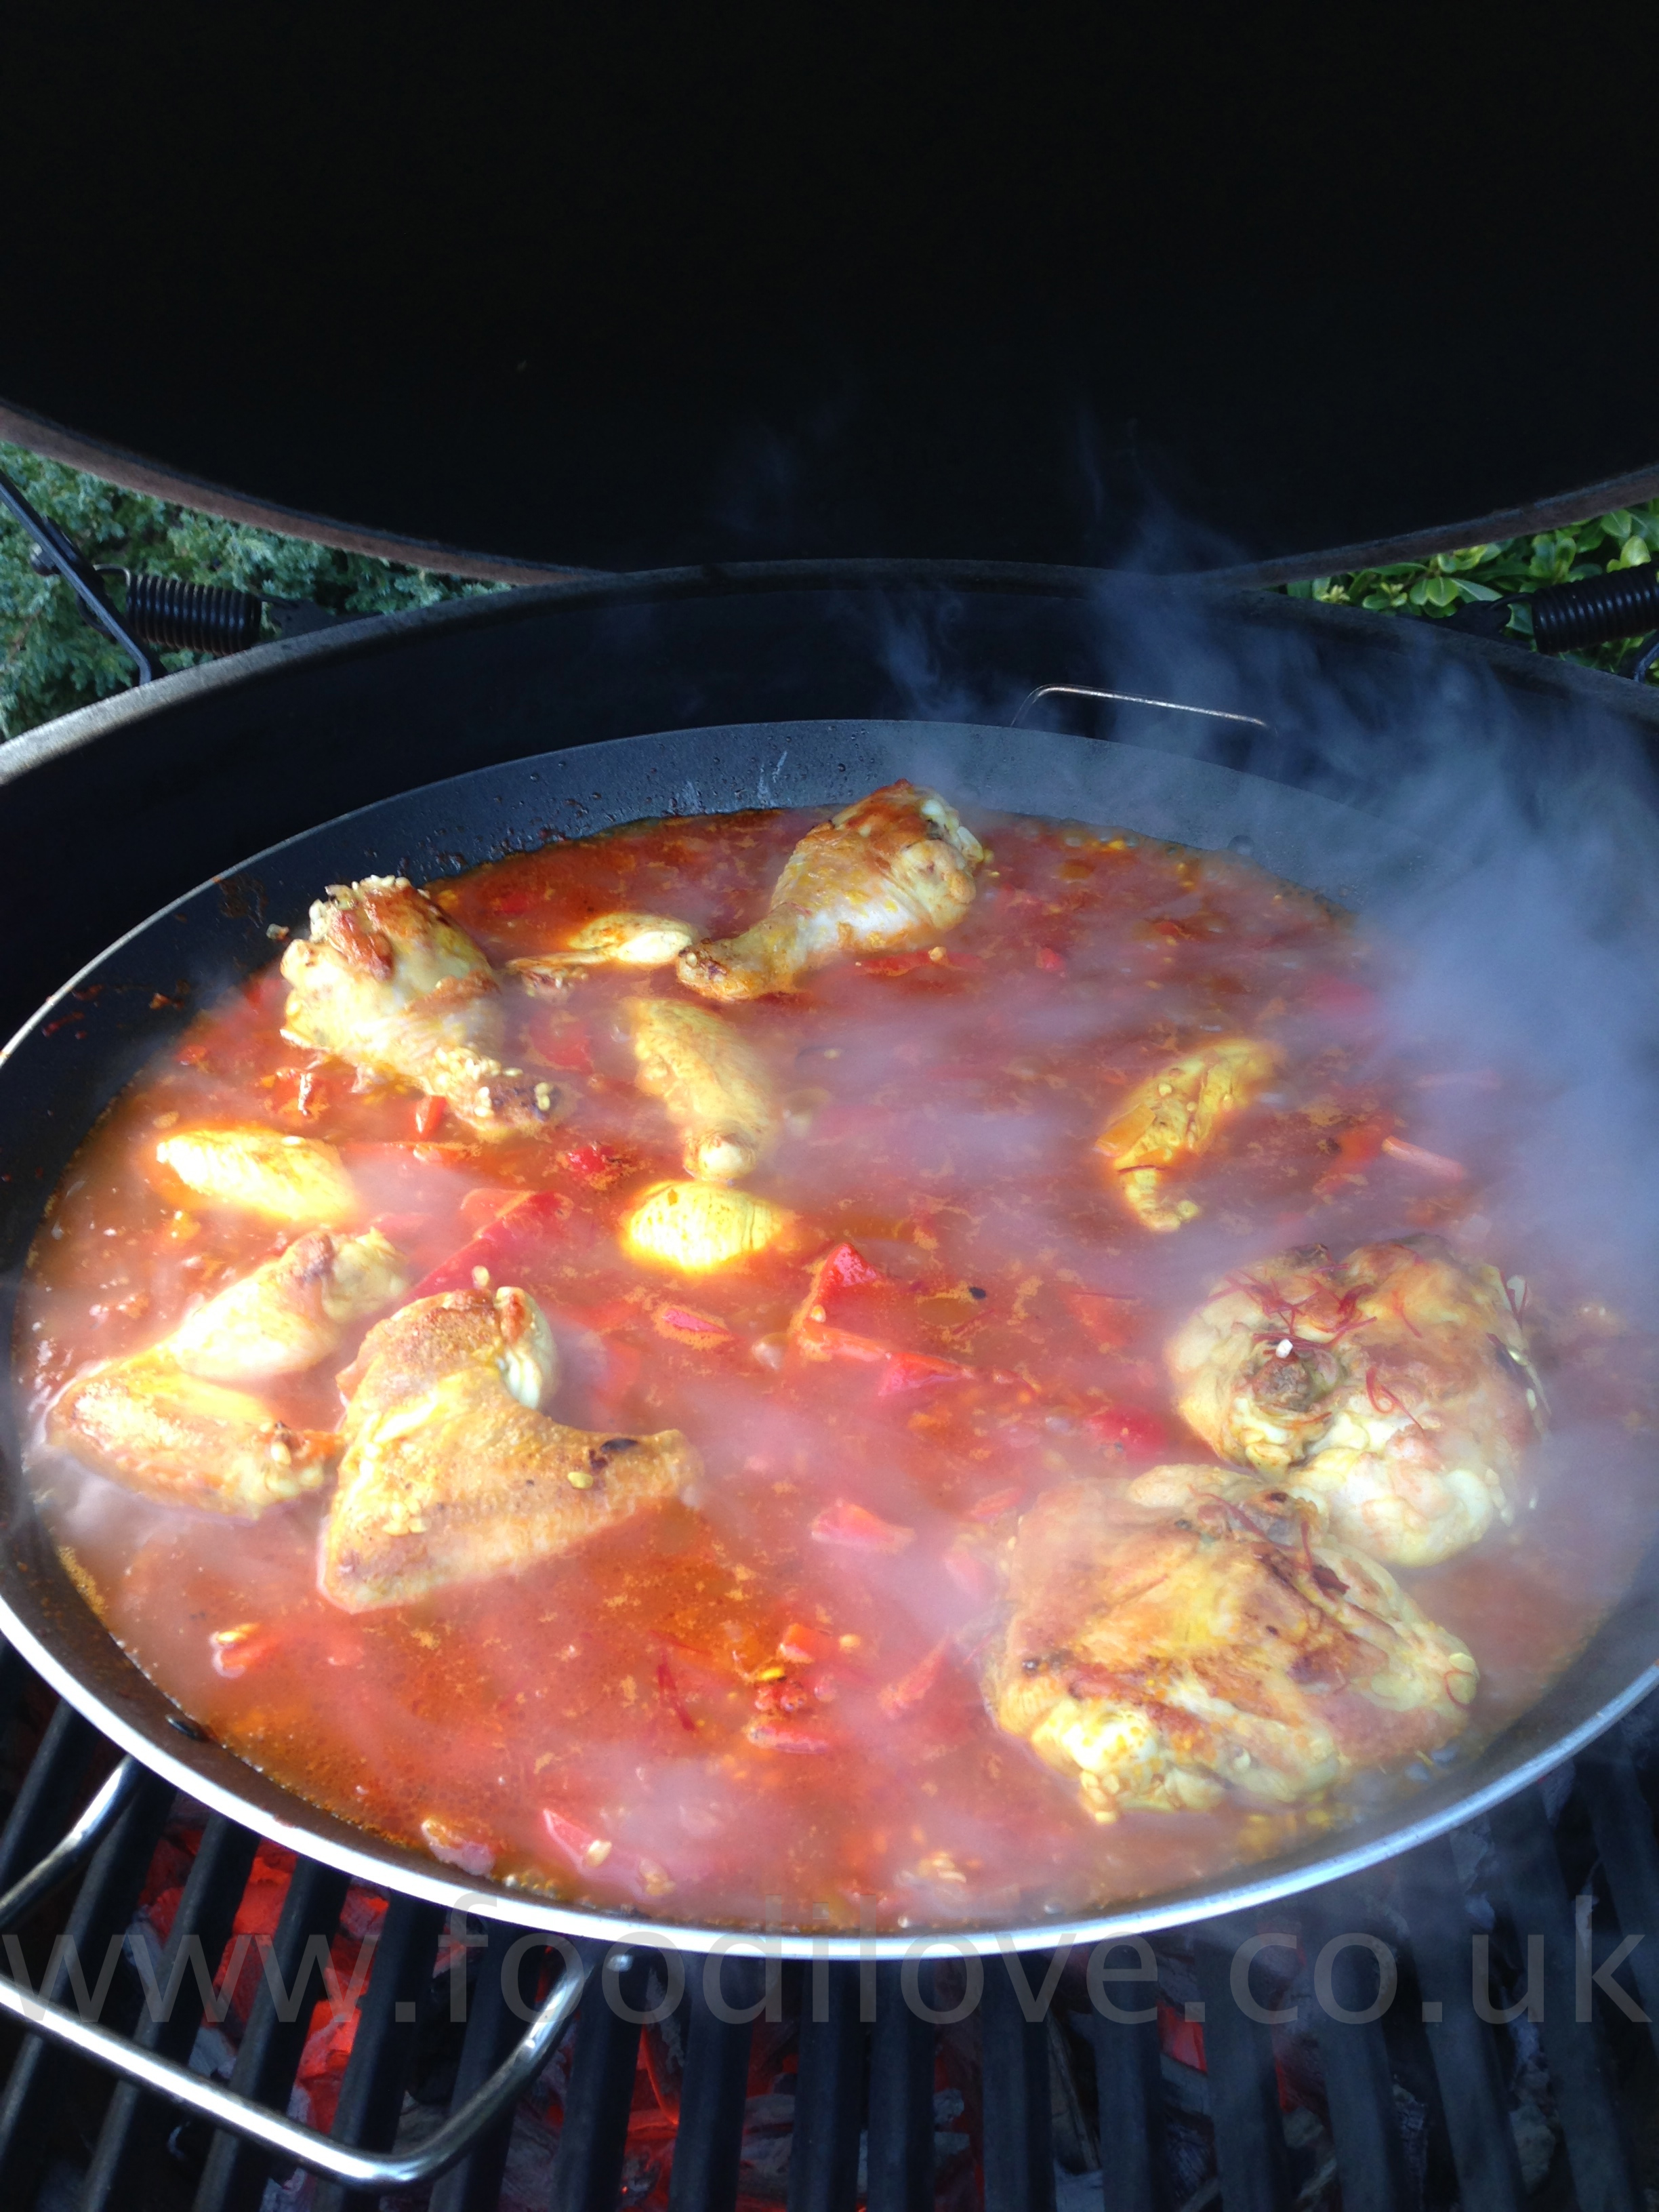
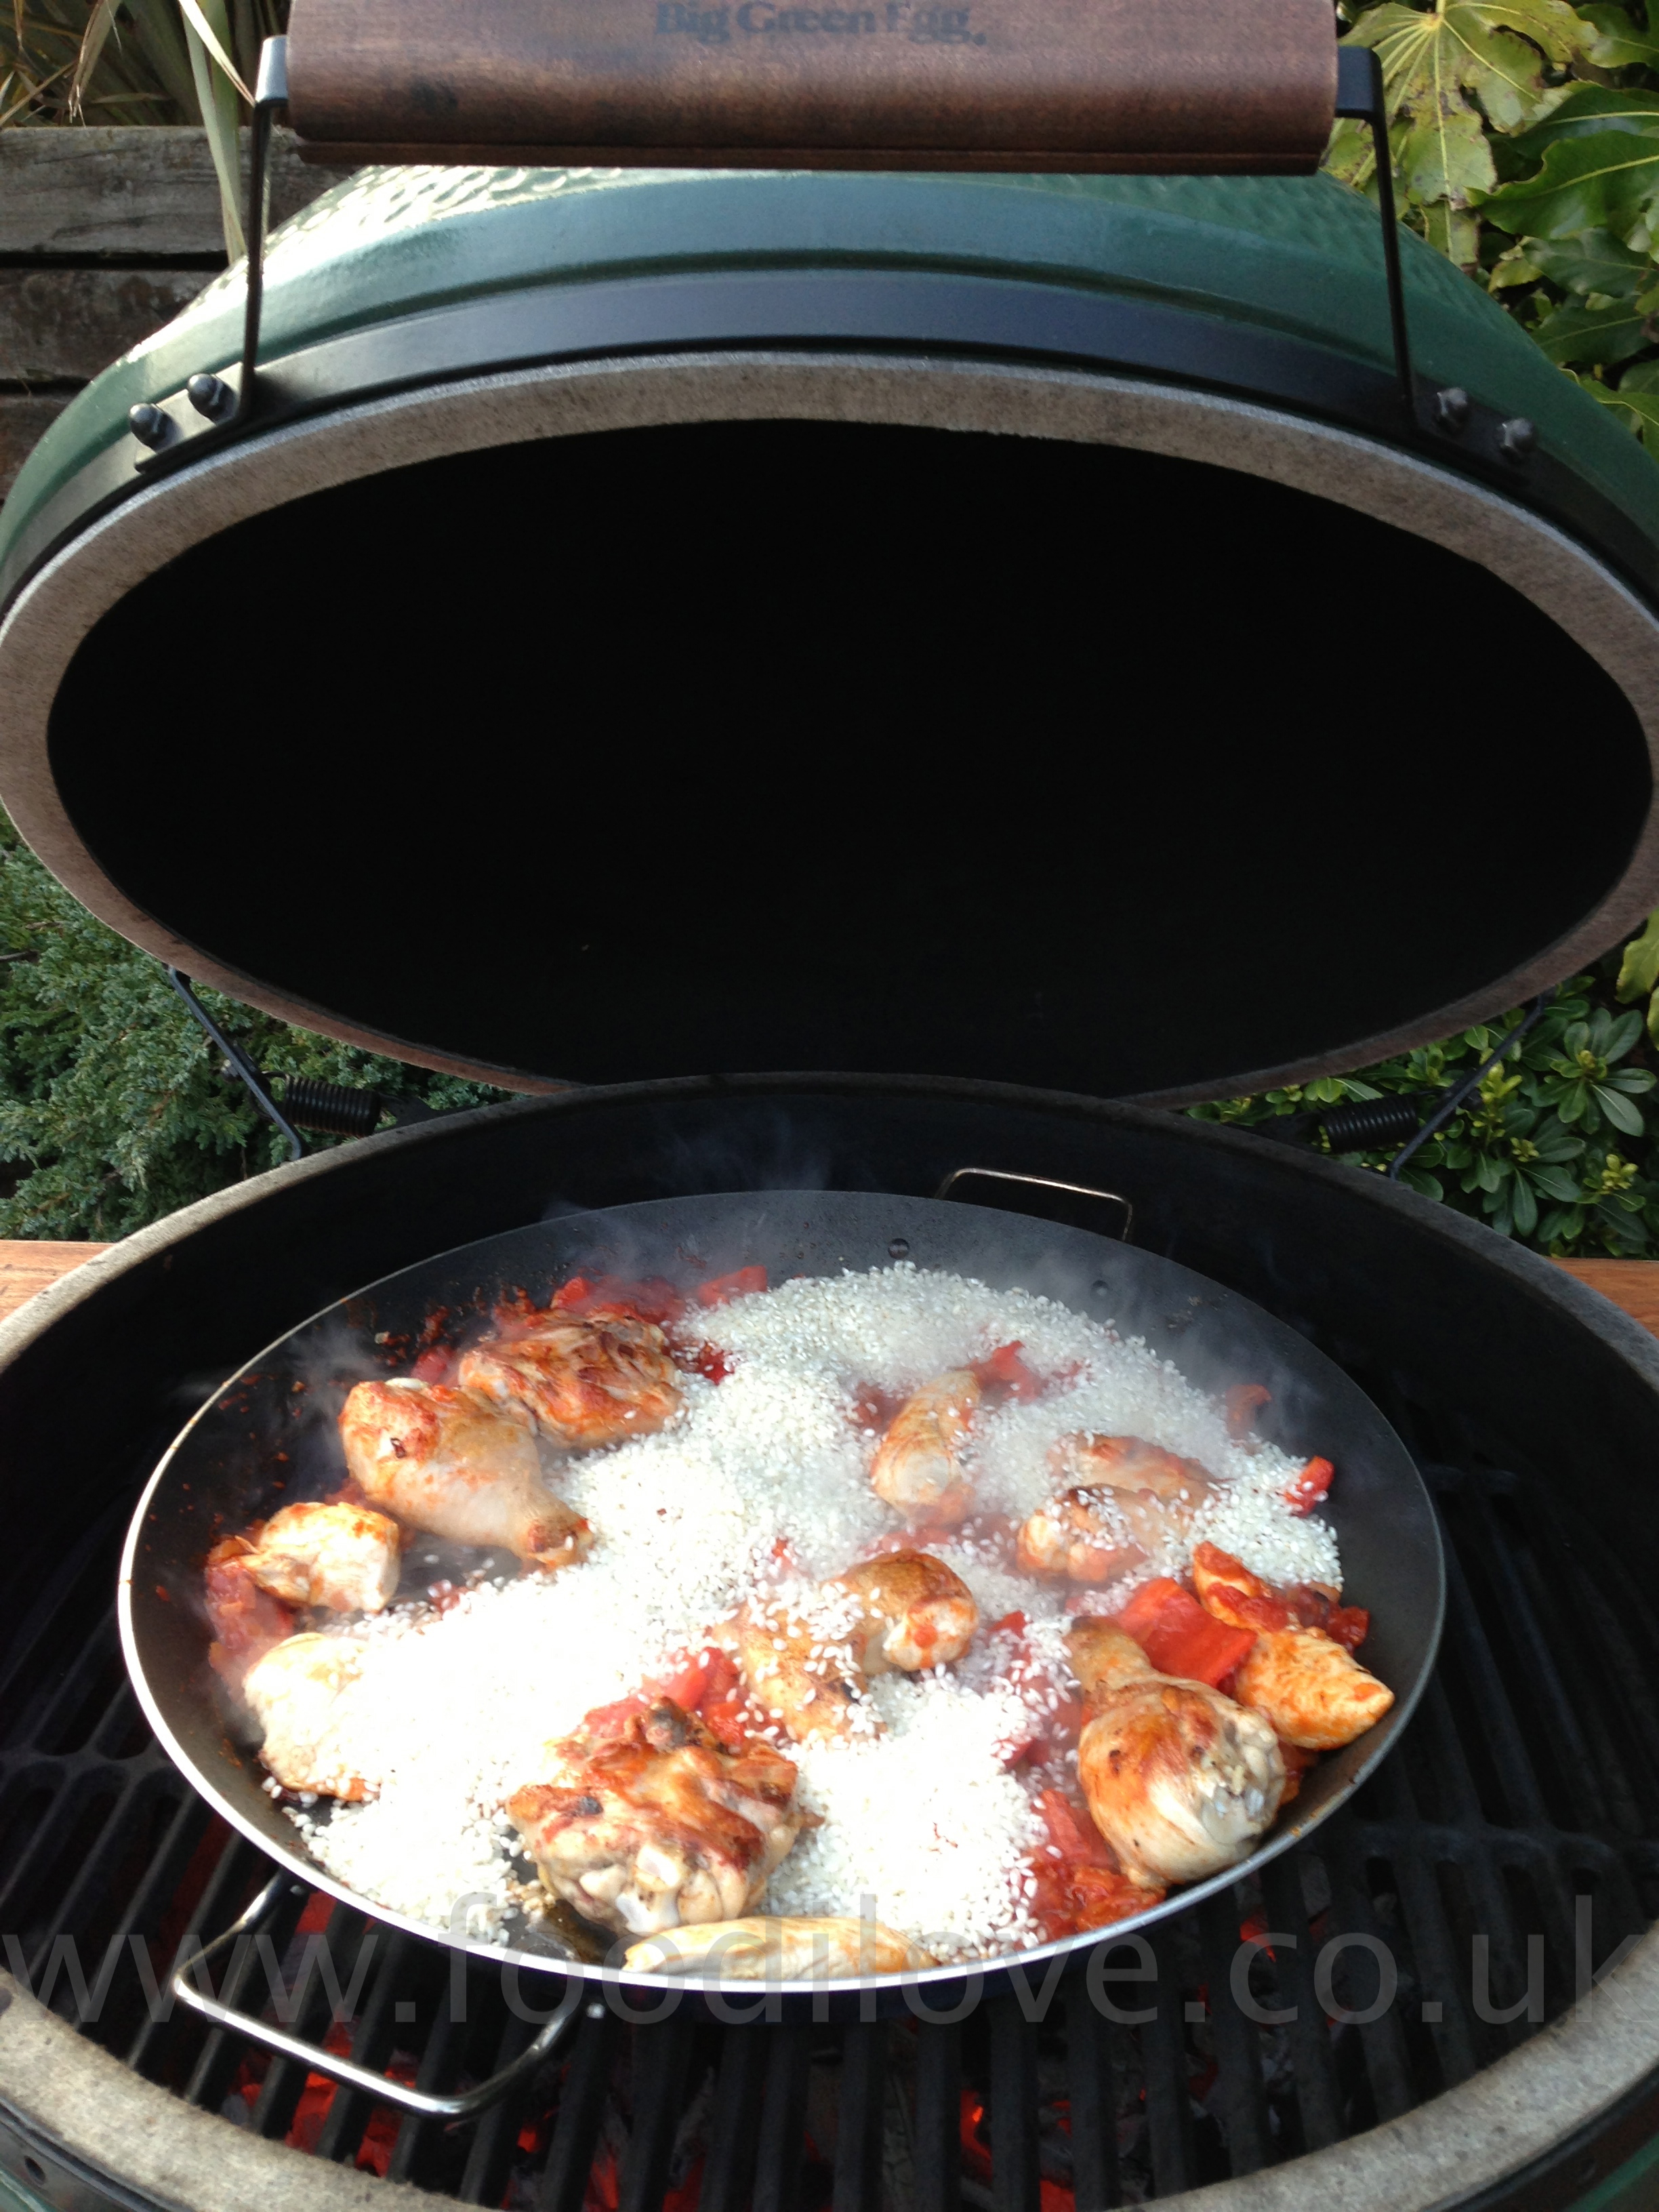
  • Add a few tablespoons of the olive oil in the Paella Pan and part cook the chicken pieces a little (longer if they contain bones) until its browned off.
  • Make up the stock and add a good pinch of the saffron stamens. Let them infuse for about 20 mins.
  • Next make the "Sofrito", one of the most important parts of the Paella, this is the tomato and onion mix which is the base of the paella.
  • First sweat the onion in the Paella Pan until soft then add the chopped/tinned tomatoes and fry over a high heat, keep stirring.
  • It will start to thicken up in to a thick dark paste. When it is a dark red paste you have the perfect sofrito!
  • Next add the chorizo, paprika and about half of the peppers. Mix around thoroughly and continue fry for few more minutes.

​

View fullsize IMG_4093.jpg
View fullsize IMG_4099.jpg
View fullsize IMG_4100.jpg
View fullsize IMG_4103.jpg
  • Now add the hot stock to the paella pan. Taste for salt and seasoning. It needs to be quite well salted, bring to the boil and leave for several minutes for all the flavours to mix in with the stock.
  • Now add the rice, mix around briefly and even out in the pan ensure all the rice grains are under the surface of the liquid. DO NOT STIR the rice after this point.
  • After about 10 minutes the rice should start to appear though the liquid.
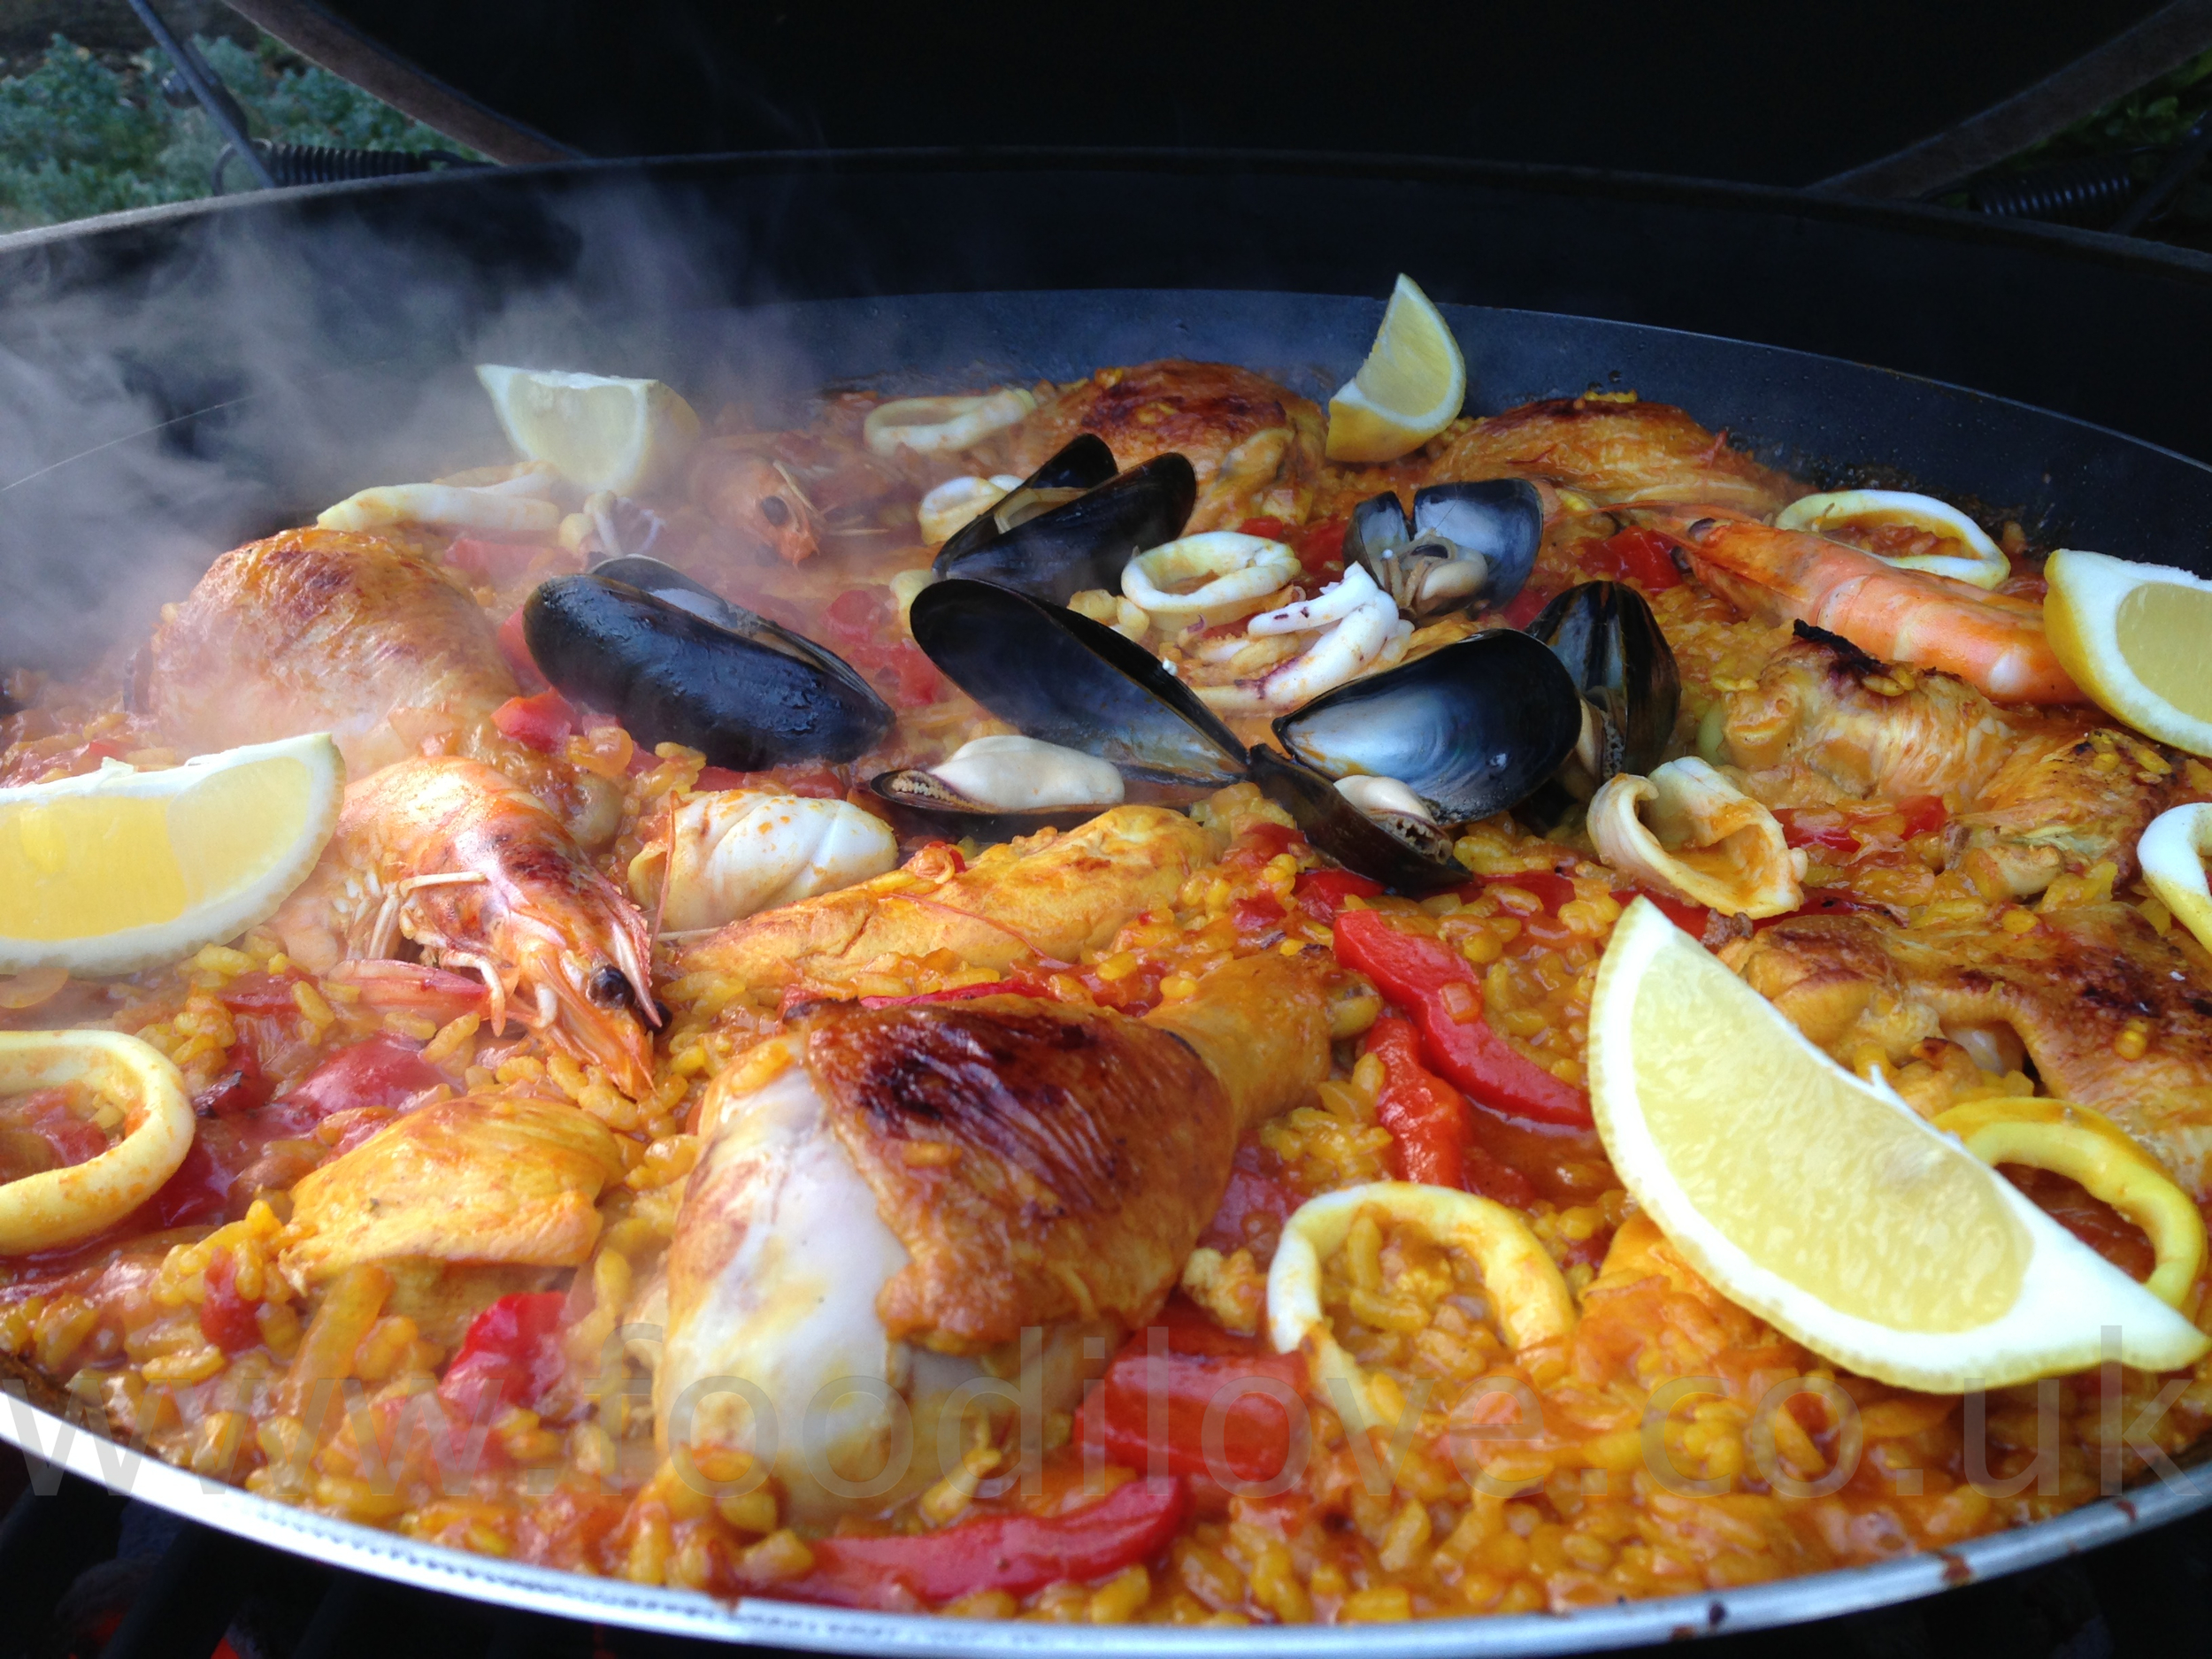
  • This is the point that you can add all the seafood that you have prepared earlier.
  • Now turn down the heat and continue to simmer for about another 10 minutes until the rice starts to dry out. (If some rice starts to appear whilst other areas still have liquid you can carefully distribute the rice around with a spoon)

​

View fullsize IMG_4109.jpg
View fullsize IMG_4116.jpg
View fullsize IMG_4111.jpg
View fullsize IMG_4120.jpg
  • Once most of the liquid has been absorbed, try the rice from under the top surface. It should be cooked "al dente" still with a slight nutty taste.
  • Now cover the Paella pan with foil and turn up the heat for a minute or so. (You will hear the rice go "pop" as it is caramelising on the bottom of the pan). This is called the "Socarrat" the most highly prized part of Paella. Covering the pan at this stage also helps finish off the cooking of the top layer of rice.
  • Turn off the heat. Decorate with lemon wedges and leave for a good 10 minutes to rest.

Serve directly from the pan at the table and remembering to scrape to the bottom to get the "socarrat", that's the greatest bit.

Add a crisp fresh salad and you will have the perfect meal for a sunny day, when it decides to come out again lol!

View fullsize IMG_4122.jpg
View fullsize IMG_4132.jpg
View fullsize IMG_4137.jpg

I wasn’t sure how this would work or even if it could be cooked on the braai but I must say it came out fantastically and everybody just loved it. Give it a try and let me know how yours comes out. I would love to hear if you have what you think is the best recipe, just leave it in the comment section below for everybody to see.

Chao Larry

April 05, 2013 /Larry Susman
Baking, Big Green Egg, Braai, Chicken, Fish, Meat, Potjiekos, Recipes
Comment
Wild
Salmon with Mango & Granadilla
Salsa on the Braai/BigGreenEgg

Wild Salmon with Mango & Granadilla Salsa on the Braai

March 08, 2013 by Larry Susman in Baking, Big Green Egg, Braai, Fish, Recipes, Smoking, Salads

Wild Salmon with Mango & Granadilla Salsa on the Braai/BigGreenEgg

Howzit, well the sun is trying to shine in the UK but I think I missed summer as Tuesday was almost 17c and sunshine all day and I was stuck in the office LOL. For this weeks braai I have gone to the other extreme after last weeks meat fest! I'm braaiing some Wild Salmon and to go with this I will be making a Mango & Granadilla Salsa. This is really a very quick and easy dish to do, especially after taking nearly 8hrs to cook last weeks ribs.

You can braai this two different ways, directly on the gills or on a wooden smoke board. I'm going to use the boards as this will lightly smoke the salmon as it cooks. If you cannot get fresh Mango & Granadilla you can use tinned but it will not be as great.

SERVES 4 : PREP: 15 MINS : MARINATE 10 MINS : COOK TIME : 8 MINS

Fish Ingredients:

  1. 4 x Salmon Steaks or fillets, about 175g each.
  2. 1 x Finely grated rind and juice of a Lime.
  3. Salt & Pepper to taste, I recommend you use quite a bit of salt at least 2 pinches per piece.
View fullsize IMG_3908.jpg
View fullsize IMG_3917.jpg

Salsa Ingredients:

  1. 1 x Large Mango, stoned and finely diced.
  2. 1 x Red Onion, finely chopped.
  3. 2 x Granadilla (passion fruit)
  4. 2 x Fresh Basil sprigs.
  5. 2 tbsp Lime juice.
  6. Salt to taste.

Method how to prepare Salmon:

  • Rinse the salmon under cold running water and then pat dry with kitchen paper and place in a shallow dish.
  • Finely grate the rind of a lime and sprinkle over the salmon, then squeeze the juice over the salmon.
  • Season to taste with salt and pepper.
  • Set aside to marinade while you make the salsa.

Method how to prepare Salsa:

  • De-pip the mango and finely chop, place it in a mixing bowl.
  • Finely chop the red onion and add to bowl.
  • Cut the Granadilla in half and scoop out the pips and juice into the bowl.
  • Tear the basil leaves up and add to the mixture.
  • Finally, pour the lime juice over the whole lot, season with salt and pepper and mix through.
  • Cover and serve once the salmon is cooked.
View fullsize IMG_3919.jpg
View fullsize IMG_3924.jpg
View fullsize IMG_3926.jpg

Method how to braai the salmon:

  • Place the Oak smoke boards in some water to soak for 15mins, this will stop them from actually catching on fire, as you only want them to smoulder.
  • Preheat the Braai/BigGreenEgg to 200ºF/94ºC.
  • Place the board face down on the Braai for 5 mins to heat up, take out ready to place the salmon on.
  • Place the salmon on the boards along with the limes that you have squeezed, this will give it a great aroma.
  • Return to the braai close the lid and cook for 8 mins, for a piece of fish that is 2-3cm thick, if its thicker than this allow another 5 mins.
Cooked Wild
Salmon with Mango & Granadilla
Salsa on the Braai/BigGreenEgg


​

It's as simple as that, boil a few new potatoes and serve with the salsa, you will end up with a fantastic dish that is full of taste and freshness. Boy was it great, I hope that you are all enjoying my ventures. If so or not as the case maybe, please feel free to let me know below. Share and like to your hearts content.

March 08, 2013 /Larry Susman
Baking, Big Green Egg, Braai, Fish, Recipes, Smoking, Salads
Comment
Hertzogkoekies
on the Braai/BigGreenEgg

Hertzogkoekies on the Braai

February 22, 2013 by Larry Susman in Baking, Big Green Egg, Braai, Cakes, Food Websites, Recipes

Hertzogkoekies on the Braai/BigGreenEgg

Well I'm back on the weather subject again and cooking in sunshine one minute and snow the next. I wish we had proper seasons in the UK so you know when to take off your boots and put some flops on! To cheer you all up I'm going to try and bake a laaties (small child) favourite cake, “Hertzogkoekies”. If you would like to make these just like your Ouma did we are giving away 3 tins of All Gold Apricot Jam so that they taste like they did back home (see end for details).

These cookies or jam and coconut tartlets are known as Hertzogkoekies in South Africa and are part of every South African housewife's traditional recipes.
They were named after General J.B.M. Hertzog, prime minister of the South Africa Union in 1924. According to legend, there was also another cookie baked in nearly the same way (the ingredients were the same) but these were named after General Jan Smuts, Prime Minister from 1919 until 1924 and then again from 1939 until 1948.

Both Smuts and Hertzog played important roles in the early political history of South Africa, both fought in the Boer Wars and the World Wars and both of them had their own staunch supporters. Interesting is that the supporters of the one would not eat the biscuits named after the other one and even today, you will still find a recipe for Hertzogkoekies and Jan Smuts koekies if you search for traditional South African cookies.

MAKES 9-10 - PREP: 40 MINS - COOK TIME: 15-20 MINS

INGREDIENTS FOR SWEET PASTRY

  1. 1 3/4 Cups plain (cake) flour
  2. 2 tsp Baking powder
  3. 2 tsp Sugar
  4. 50g unsalted butter
  5. 3 x egg yolks
  6. pinch of salt 

​

METHOD FOR MAKING PASTRY

  • Sift the flour onto a clean smooth work surface and make a well in the centre.
  • Add the butter which you have cubed up and rub it in with your fingers. Make into a texture that resembles crumbs.
  • Add the egg and mix until the pastry is formed.
  • Rest the pastry for 15 minutes in the fridge covered with cling film.
  • Then roll out to 5 mm thickness on a floured surface and use cutter to make circles ready to be filled (if time is of the essence, buy ready made pastry).
View fullsize IMG_3719.jpg
View fullsize IMG_3711.jpg
View fullsize IMG_3712.jpg
View fullsize IMG_3714.jpg

INGREDIENTS FOR FILLING

  1. ¾ cup Sugar
  2. 2 cups Desiccated coconut
  3. 3 egg whites
  4. 8 tbsp smooth apricot jam
  5. 12 glacé cherries (optional)
View fullsize IMG_3731.jpg
View fullsize IMG_3728.jpg
View fullsize IMG_3734.jpg
View fullsize IMG_3737.jpg

METHOD FOR  MAKING THE FILLING

  • Pre Heat the Braai to 180°C (350°F).
  • Stiffly beat the egg white into firm peaks then gently fold in the sugar and coconut, its that simple. Place half a teaspoon of jam in the bottom of each lined patty and then generously cover with the coconut mixture. Place a cherry on the top of each if you choose to, personally I love that final sweet taste of cherry on the last bite.
  • Tip 
When filling the jam tarts, put a spoonful of apricot jam into a plastic bag containing a little flour. Shake the bag until the jam is well coated with flour, then place onto pastry. This will ensure that the jam does not "leak" during baking.
  • Finally place in the braai to bake for 15-20 minutes and you will end up with some great koekies. 
View fullsize IMG_3741.jpg
View fullsize IMG_3756.jpg
View fullsize IMG_3771.jpg
View fullsize IMG_3784.jpg

Fancy making some of these? We are giving away 3 tins of All Gold Apricot Jam so that you can make them taste like they did back home. All you have to do is please leave some feed back and you could be 1 of 3 lucky people that get a chance to make this really great South African Snack. Also I love to hear what you think about what I'm cooking, feel free to leave suggestions what you would like to see me cook. Entries will close on the 8th March 2013.

February 22, 2013 /Larry Susman
Baking, Big Green Egg, Braai, Cakes, Food Websites, Recipes
Comment
Bunny
Chow on the Braai/BigGreenEgg

Bunny Chow on the Braai!

February 15, 2013 by Larry Susman in Baking, Beef, Big Green Egg, Braai, Bread, Curries, Hot & Spicy, Meat, Recipes

Bunny Chow on the Braai/BigGreenEgg

This week I'm going to be making a very Durban dish “Bunny Chow” this is comprising of two things that I have made previously to give one very unique dish. The origins of this dish are disputed but one of them goes as follows (which also provides an etymology for bunny chow) it is that a restaurant run by people known as Banias (an Indian caste) first created the scooped-out bread and curry dish at a restaurant-cum-cafe called Kapitan's on the corner of Victoria and Albert streets in Durban. The food was a means to serve take-aways to excluded people. During the apartheid regime, Indians were not allowed in certain shops and cafes and so the shop owners found a way of serving the people through back windows, etc. This was an easy and effective way to serve the workers. The traditional Indian meal was roti and beans, however rotis tended to fall apart as a take-away item. So they cut out the centre portion of the bread and filled it with curry and capped the filling with the portion that was cut out.

This recipe is great, made form left over curry the next day or freeze and use whenever you need a quick snack. If you haven’t got time you don’t need to make the bread yourself but if you can its worth it, take my word for it. However if you cook this from scratch you will not regret it!

PREP:15 MINS – COOK TIME: 2hrs

Ingredients for making Curry :

  1. 1 x pack of werners Curry spices, from Mild to Ex-Hot
  2. 500g Meat, cubed to bite size
  3. 2 x medium potatoes, peeled and chopped to 2-4 cm (I've added sweet potatoes as well)
  4. 3 x medium tomatoes chopped or tin if you're lazy like me
  5. 3 x large finely chopped Garlic cloves
  6. 2-3 tsp chopped fresh Ginger (i like a bit more personally)
  7. 1 x chopped red onion
  8. 1 x red pepper chopped
  9. Handful of chopper coriander leaves

Method for making Curry:

  • Put the meat into a bowl and add the dry Powdered Spices from the pack to the meat and stir with a wooden spoon until all the meat is coated and there is no loose power left. Place aside and leave to marinate for a short while.
  • Add all the Non-Powdered spices to a tablespoon of olive / vegetable oil in a large saucepan or potjie (dutch Oven) over a medium heat and fry off the spices until the aromas from the spices start to smell wonderful.
  • Add onions and peppers.
  • Add the meat and lightly brown for a few minutes. Sirt constantly to stop the meat from sticking.
  • Add the Garlic and Ginger.
  • Add the potatoes, tomatoes and then pour some water over the whole lot until it just covers all the ingredients.
  • Leave to simmer for 1-3 hours at 200°C (400°F) if in a oven or on low heat if on a cooker plate, as i said the longer the better.
  • Depending on how you like your curry, simmer the water until it evaporates away to the thickness of gravy that you prefer.

PREP:15 MINS – PROVE 2-4HRS – COOK TIME: 25mins

Ingredients for the Brown Rolls: Makes 4 large rolls

  1. 500 g Mixed Grain Bread Flower flour if you can the Wessex Mill was fantastic
  2. 2 teaspoons of dried yeast or 15g or fresh yeast
  3. 320 ml of lukewarm water  
  4. 1.5 tsp sugar
  5. 10g or 11/2 teaspoon of salt
  6. 2.5 tbsp of olive oil
  7. Flower (to sprinkle on the cooking surface so that it does not stick)

Method for making the Bread

  • Pre Heat the Braai to 250°C (480°F)
  • Mix the sugar and yeast into small bowl and stirring in 90 ml of the water. Leave it in a draft free spot to activate. If it doesn't start bubble and ferment in about five minutes, then you are going to have to start again as this is an important part process. Your yeast must be fresh and active as this is what is going to make your dough rise.
  • Then mix the flower and salt in a bowl or food processor fitted with a plastic blades, do it by hand it's a lot more fun. Add the olive oil and the remaining water to the flour as well as the balance of the yeast mixture and start to stir until it makes a loose crumbly mix, then roll into a ball and empty it onto flat surface covered with flour. Now you are going to have to knead for at least eight to ten minutes, this helps the bread to start to. If you need to add a little more flour or a few drops of water do so as necessary. The final dough should not be sticky but is dry to the touch.
  • Next rub the inside of a large bowl with some olive oil, place you dough mix into it and then roll the ball around the bowl and coat with the olive oil. Then cut small crossing the top of the dough with sharp knife and cover with a teacloth or put it in a large plastic bag with space to grow and leave in a draft free area for about 1-1 1/2 hours until the dough has doubled in size. Once it has risen quite substantially, to double its original size, you will need to punch it down to reform it to the size it was originally. You'll notice that it seems to be very light and airy (it will be slightly heavier with brown bread) and if it's like this then you're onto a winner.
  • At this stage you can now store it for up to 4 hours in the fridge to use later, just remember to bring it back to room temperature before you start to use it. Cut your dough into 4 and roll into balls, then using the palm of your hand you are going to kneed the dough for a second time for a minuet or two. Then reshape and cover with a teacloth or put it in a large plastic bag with space to grow and leave in a draft free area for about another two hours to prove again. I suggest leaving it a t this stage on the backing tray or bread peel that you will use to put it in the braai to cook with. This is so that you don’t have to pick the dough up again which will cause you to know the air out of it and this is where it will sink and you will end up with a poorly risen loaf of bread.
  • Place it in the braai/BigGreeEgg and close the lid, whatever you do don’t be tempted to open the lid for the first 10 mins of the bake. This will only cause the bread to deflate and sink not only that it also stops the yeast from being baked off. If you don’t allow the heat to kill the yeast you will end up with a severe case of indigestion as the bread will still be fermenting in your chest after you have eaten it.
  • After about 20 mins or so open the lid up and carefully lift up the bread, turn it on its side and give it a tap with your knuckle. If it sounds like a drum then its cooked if not place it back down and give it another couple of mins to bake.

Once cooked place on a rack to cool for 20 mins at least now get the curry you prepared earlier. 

View fullsize IMG_3781.jpg
View fullsize IMG_3761.jpg
View fullsize IMG_3749.jpg
View fullsize IMG_3751.jpg

Once cooled cut the top of the roll off but don’t discard it as this will form the lid of your bunny chow. Take the bottom and scrape all the bread out of it so that you create a bread bowl, this is where you will but the Durban Curry place to top on it and serve to you hungry friends and family.

View fullsize IMG_3789.jpg
View fullsize IMG_3785.jpg
View fullsize IMG_4188.jpg
View fullsize IMG_3802.jpg

Please feel free to leave your comments below as I love to hear what you think about my cooking and make suggestions what you would like to see me cook in future.

February 15, 2013 /Larry Susman
Baking, Beef, Big Green Egg, Braai, Bread, Curries, Hot & Spicy, Meat, Recipes
Comment
Cheese & Garlic Boerewors Sausage Rolls cooked on the Braai/BigGreenEgg

Cheese & Garlic Wors Rolls on the Braai/BigGreenEgg

February 08, 2013 by Larry Susman in Baking, Big Green Egg, Braai, Food Websites, Meat, Recipes, Beef

Cheese & Garlic Boerewors Sausage Rolls cooked on the Braai/BigGreenEgg

Howzit, thanks for all your support it's really appreciated and your are growing in number every week, please continue to spread the word. This week I'm cheating a little as the main ingredient is made by me at our factory so I will not be giving out our boerewors recipe as its top secret. But you can also cheat and buy it from us on our website www.biltong.co.uk . Or even better leave a comment at the bottom of this blog and have a chance to be one of 2 lucky people that we will be giving away two packs of boerewors to, so you can make your own. Sorry but this is only open to UK mainland residence as we cannot ship fresh meat out of the country.

What I though I would make this week is something really quick and easy and that you can snack on at anytime of the day “Boerewors Sausage Rolls”. You can cheat even more and buy ready made pastry but we used a very good quick recipe to make your own. I choose our “Cheese & Garlic Wors” as I thought it would be a little different to the norm but you can make it out of type you like so lets crack on.

PREP:15 MINS – PROVE 20mins – COOK TIME: 25mins

Ingredients for Puff Pastry

  1. 250g strong plain flour
  2. 1 tsp fine sea salt
  3. 250g butter , at room temperature, but not soft
  4. about 150ml cold water
  5. 1 x Pack of our Cheese & Garlic Boerewors.
  6. This is enough to make about 700g pastry.

Method for making the Pastry

  • Pre-heat the Braai or over to 200°C (395°F)
  • Sift the flour and salt into a large bowl or clean work surface and roughly break the butter in small chunks. Add them to the bowl and rub them in loosely you need to able see bits of butter.
  • Make a well in the bowl and pour in about two-thirds of the cold water, mixing until you have a firm rough dough adding extra water if needed. Cover with cling film and leave to rest for 20 mins in the fridge.
  • Turn out onto a lightly floured board, knead gently and form into a smooth rectangle. Roll the dough in one direction only, until 3 times the width, about 20 x 50cm. Keep edges straight and even. Don't overwork the butter streaks; you should have a marbled effect.
  • Fold the top third down to the centre, then the bottom third up and over that. Give the dough a quarter turn (to the left or right) and roll out again to three times the length. Fold as before, cover with cling film and chill for at least 20 mins before rolling to use.
  • Roll the pastry out into a long strip about 15cm wide ready to receive the boerewors.
View fullsize IMG_3652.jpg
View fullsize IMG_3655.jpg
View fullsize IMG_3658.jpg
View fullsize IMG_3661.jpg
View fullsize IMG_3668.jpg
View fullsize IMG_3667.jpg
View fullsize IMG_3671.jpg
View fullsize IMG_3678.jpg

Method for making the Boerewors (Sausage) Rolls:

  • It's really simple now, all you have to do is take the boerewors out to the skins (don’t leave this on as the will be tough if you cook the rolls with it on) and roll into mini sausage shapes about 10cm long and 1.5 circumference.
  • Place them on the pastry and cut across, take the egg yolk mix and brush the open side and fold over. Pinch the edge so that they seal and then score the tops with a sharp knife. Finally brush the tops of the rolls with the egg yolk so that it browns nicely and then place in the braai for 25 mins to cook. Keep an eye on the after about 20mins as you don’t want them to burn.
  • The juices from the wors will run out and be soaked up by the pastry, wow did this taste great. I would recommend that you make the wors a little longer that the pastry as when the pastry cooks it expands and can leave a gap at the end. Which is what happened to mine but on the other hand, if like me, you like pastry don’t worry lol.
View fullsize IMG_3680.jpg
View fullsize IMG_3695.jpg
View fullsize IMG_3687.jpg

If you would like to win one of the packs of two of our Cheese & Garlic Boerewors then please leave some feed back and you could be 1 of 2 lucky people that get a chance to make this really great South African Snack. Also I love to hear what you think about what i'm cooking, feel free to leave suggestions what you would like to see me cook.

Sorry but this is only open to UK mainland residence (but I would still love to know your thoughts even if you cannot win the prizes) as we cannot ship fresh meat out of the country, please post your comments by the 22nd February 2013.

February 08, 2013 /Larry Susman
Baking, Big Green Egg, Braai, Food Websites, Meat, Recipes, Beef
15 Comments
  • Newer
  • Older

© 2017 Susmans Best Beef Biltong Co Ltd